31 Jan DIY Home Gym Equipment Guide: Build Your Own
Home Made Gym Equipment: DIY Fitness on a Budget
Home made gym equipment has revolutionized how fitness enthusiasts approach their workout routines without emptying their wallets. Building your own fitness gear isn’t just about saving money—it’s about creating a personalized workout space that fits your exact needs and available space.
The commercial gym equipment industry wants you to believe you need thousands of dollars worth of gear to get fit. That’s simply not true, and I’m here to show you exactly how to create professional-quality workout tools using everyday materials you probably already have lying around your house.
Why Choose DIY Exercise Equipment Over Store-Bought?
Cost savings are the most obvious advantage when you decide to build your own gym tools. A complete home gym setup from retail stores can easily cost $2,000-$5,000, while a DIY approach might run you $100-$300 for similar functionality.
You gain complete control over customization with homemade equipment. Need dumbbells in 3-pound increments instead of standard 5-pound jumps? Make them yourself to match your exact progression needs.
Space efficiency becomes easier when you design equipment specifically for your available area. Commercial equipment comes in standard sizes that might not fit your apartment, garage, or spare bedroom perfectly.
Quality construction often surprises people who try DIY gym equipment for the first time. When you use proper materials and techniques, homemade tools can outlast their commercial counterparts because you’re not cutting corners for mass production.
Essential DIY Gym Equipment You Can Build This Weekend
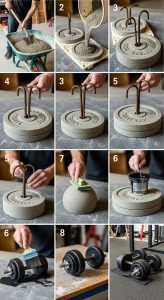
Homemade Dumbbells and Free Weights
Diy dumbbells are probably the easiest place to start your home gym journey. Concrete-filled weights offer the best durability and authentic feel compared to store-bought options.
Here’s what you’ll need for basic concrete dumbbells:
- Quick-setting concrete mix
- PVC pipes (1-inch diameter for handles)
- Large plastic bottles or cylindrical molds
- Duct tape and release agent
- Paint for finishing touches
The process takes about 2-3 hours including drying time. Mix your concrete according to package directions, pour it into your molds with the PVC pipe centered as a handle, and let it cure for 24-48 hours.
Water-filled milk jugs work perfectly as adjustable light weights for beginners. Each gallon weighs approximately 8 pounds when filled, giving you instant dumbbells for bicep curls and shoulder presses.
Sand-filled alternatives provide even more weight in the same container size. A gallon jug filled with sand weighs roughly 12-13 pounds, perfect for intermediate strength training.
Check out these premium weight benches that complement your DIY equipment perfectly when you’re ready to expand.
DIY Resistance Bands and Suspension Trainers
Gym tools for resistance training don’t require expensive branded bands when you know the alternatives. Bicycle inner tubes make excellent resistance bands with varying tension levels depending on the tube thickness.
Old bicycle tubes cost nothing if you visit a bike shop—most mechanics throw them away and will gladly give you their discards. Cut them to different lengths for various exercises and resistance levels.
Suspension trainers similar to TRX systems can be built using climbing rope and PVC handles. The total cost runs about $15-$20 compared to $200+ for commercial versions.
Secure your suspension trainer to a door anchor point, sturdy tree branch, or ceiling-mounted eye bolt. The versatility rivals any expensive system you’d find at sporting goods stores.
Building Your Own Weight Bench
A sturdy diy workout equipment bench forms the foundation of many strength exercises. You’ll need basic carpentry skills and about $40-$60 in materials.
Shopping list for a basic flat bench:
- One 2×12 board (8 feet long) for the bench top
- Four 2×4 boards for the legs and supports
- Wood screws (3-inch deck screws work great)
- High-density foam padding
- Vinyl or leather fabric covering
- Wood glue for extra stability
Cut your lumber to size with legs approximately 16-18 inches tall for standard bench height. Attach cross-braces between legs for stability that supports 300+ pounds safely.
Padding makes the difference between a usable bench and one that sits in the corner. Use at least 2 inches of high-density foam covered with durable vinyl secured with a staple gun.
For incline and decline options, add adjustable brackets or build multiple benches at different angles. This adjustable weight bench guide offers inspiration for more complex builds.
Creating Your Mini Gym At Home
Mini gym at home ideas work perfectly for apartment dwellers or those with limited square footage. The key is selecting multipurpose equipment that folds, stacks, or mounts on walls.
Wall-mounted pull-up bars take zero floor space when installed properly. A simple pipe mounted between two wall studs costs under $20 and supports bodyweight exercises that build serious upper body strength.
Foldable workout platforms serve as step boxes, elevated surfaces for push-ups, or simple benches. Build them with hinges so they collapse flat against the wall when not in use.
Doorway-mounted equipment maximizes vertical space that otherwise goes unused. Resistance band anchor points, pull-up bars, and suspension trainer mounts all utilize door frames effectively.
Storage solutions matter just as much as the equipment itself. Vertical racks keep dumbbells organized, while hooks and pegboards display resistance bands and accessories within easy reach.
Explore these space-saving gym equipment options to complement your DIY setup in small spaces.
Advanced DIY Projects for Serious Lifters
Homemade Power Rack and Squat Stand
Homemade gym equipment reaches professional levels when you tackle a power rack build. This project requires more skill and investment (around $200-$300) but saves you $800-$1,500 compared to commercial racks.
Use steel pipe or thick-walled square tubing for the uprights. The frame must support 400-600 pounds safely, so material quality cannot be compromised here.
J-hooks for the barbell rest can be fabricated from heavy-duty shelf brackets or welded steel pieces. Safety spotter arms prevent catastrophic failures during heavy squats or bench presses.
The footprint measures approximately 4×6 feet for a functional power rack. Bolt it to concrete floors or add heavy weight plates as base stability if floor mounting isn’t possible.
DIY Cable Machine System
Cable machines rank among the most versatile diy gym equipment pieces you can build. The pulley system allows hundreds of exercise variations targeting every muscle group.
Basic components include:
- Heavy-duty pulleys rated for at least 200 pounds
- Steel cable or aircraft cable (1/4-inch diameter minimum)
- Weight stack or plate loading system
- Mounting frame from wood or metal
- Various handle attachments
Mount pulleys at multiple heights for different exercises. High pulleys enable lat pulldowns and tricep extensions, while low pulleys handle rows and bicep curls.
Loading pins allow you to use standard weight plates instead of purchasing expensive weight stacks. This keeps costs down while maintaining full functionality.
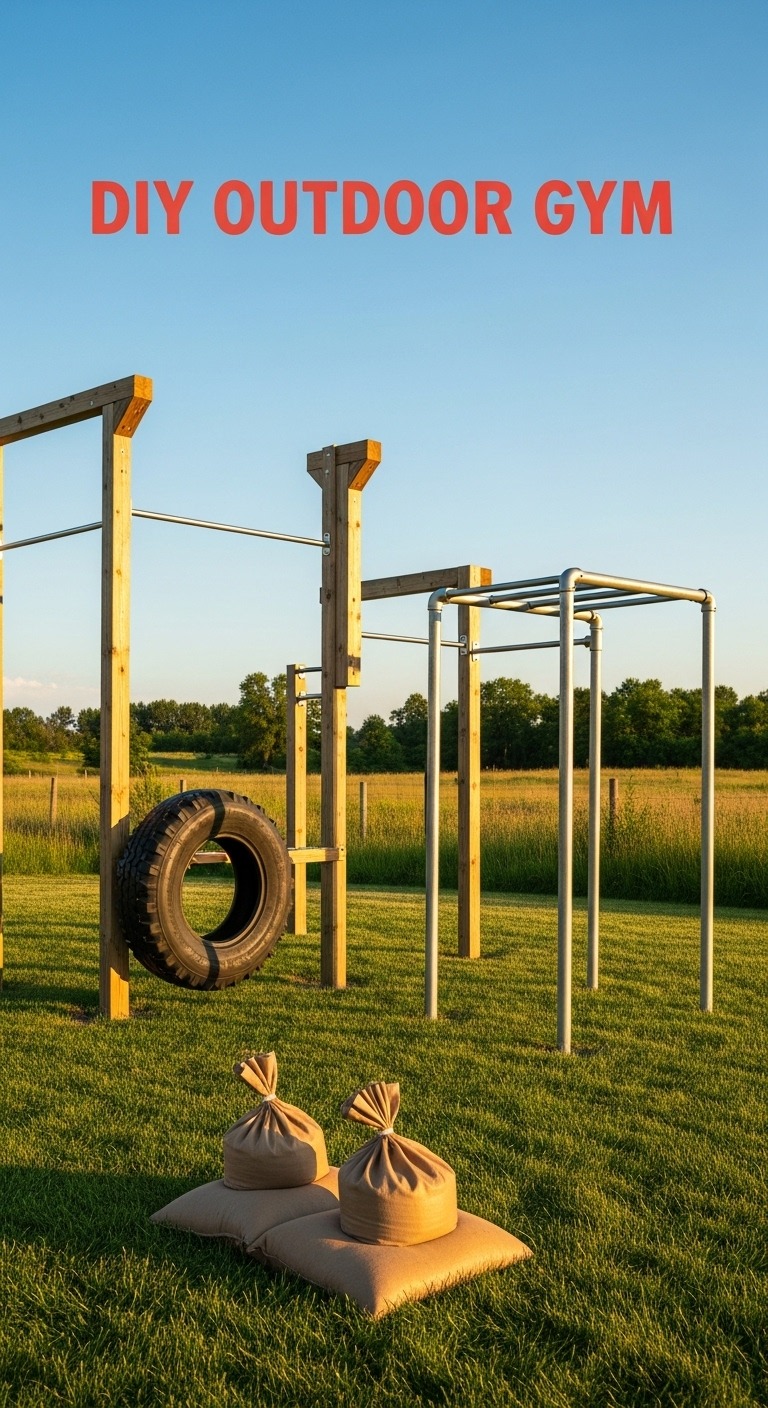
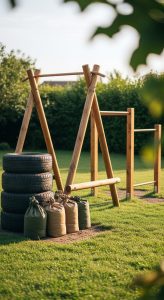
Building an Outdoor Fitness Station
Diy outdoor gym setups bring fresh air and natural vitamin D into your fitness routine. Weather-resistant materials ensure your investment lasts through seasons of use.
Treated lumber resists rot and insect damage in outdoor environments. Use galvanized or stainless steel hardware to prevent rust from rain and humidity exposure.
Concrete footings create stability for permanent installations. Dig holes 2-3 feet deep, set your posts, and fill with quick-setting concrete for structures that withstand heavy use.
Multi-station designs maximize limited yard space:
- Pull-up bar with multiple grip positions
- Parallel dip bars
- Box jump platforms
- Tire flip area
- Battle rope anchor points
Weatherproof coating extends equipment life significantly. Apply outdoor paint or wood sealant annually to maintain appearance and structural integrity.
These outdoor gym equipment ideas provide additional inspiration for backyard fitness spaces.
An attractive outdoor DIY gym setup
How To Use Gym Equipment Safely and Effectively
How to use gym equipment properly applies equally to DIY and commercial tools. Safety becomes your responsibility when you’re both the manufacturer and the user.
Inspect every piece before each workout session. Check for loose bolts, fraying ropes, cracking concrete, or splintering wood that could cause injury during exercise.
Weight capacity matters more than ever with homemade equipment. Test new builds conservatively—start with lighter weights and gradually increase load as you verify structural integrity.
Proper form prevents injury regardless of equipment type. Research correct technique for each exercise, watch tutorial videos, or consult with a trainer to ensure you’re moving safely.
Maintenance schedules keep DIY equipment functional for years:
- Tighten all bolts and screws monthly
- Re-paint or re-seal outdoor equipment seasonally
- Replace worn resistance bands immediately
- Check weight plate security before lifting
- Clean and dry equipment after outdoor use
Progression tracking helps you understand when equipment needs upgrading. If you’ve outgrown your 50-pound concrete dumbbells, it’s time to build heavier versions or add a barbell setup.
Materials and Tools You’ll Need
Smart homemade workout equipment construction starts with understanding material properties and having the right tools available.
Essential Materials
Concrete remains the most versatile material for weight creation. Quick-setting varieties save time, while regular concrete mix costs less for larger projects.
Lumber selection depends on your project—softwoods like pine work fine for light-duty equipment, but hardwoods provide better durability for benches and racks that see heavy use.
Metal components add strength where wood alone won’t suffice. Steel pipes, angle iron, and flat bar stock handle heavy loads without bending or breaking.
Fasteners must match your load requirements. Use grade 8 bolts for critical connections, deck screws for wood joints, and proper anchors for wall-mounted equipment.
Padding materials include foam, old carpet, yoga mats, or even cut-up pool noodles. The goal is protecting both you and your equipment from impact damage.
Tool Requirements
Basic builds require only common household tools:
- Drill and drill bits
- Saw (circular, miter, or hand saw)
- Screwdriver set
- Measuring tape
- Level
- Safety glasses and gloves
Advanced projects might need specialized equipment like welders, angle grinders, or metal-cutting saws. Consider borrowing or renting these tools rather than purchasing them for a single project.
Safety equipment isn’t optional when working with power tools and heavy materials. Protect your eyes, ears, and hands throughout the construction process.
Cost Breakdown: DIY vs. Commercial Equipment
Diy exercise equipment delivers remarkable savings when you compare project costs against retail prices.
DIY Cost Examples
- Concrete dumbbells (pair): $8-$15 vs. $40-$80 retail
- Resistance bands: $5-$10 vs. $30-$50 retail
- Weight bench: $50-$75 vs. $150-$300 retail
- Pull-up bar: $15-$25 vs. $80-$150 retail
- Power rack: $250-$350 vs. $800-$1,500 retail
A complete DIY home gym with dumbbells, bench, pull-up bar, resistance bands, and a power rack runs approximately $350-$500 total. The equivalent commercial setup costs $1,500-$2,500 minimum.
Time investment factors into the true cost calculation. Building basic equipment takes 4-8 hours spread across a weekend, while complex projects like power racks might require 15-20 hours.
The value extends beyond monetary savings—you gain skills, customization, and the satisfaction of using equipment you built yourself. These affordable home gym solutions round out any DIY setup nicely.
Common Mistakes to Avoid
First-time builders often underestimate weight requirements. Build everything stronger than you think necessary—the difference between 200-pound capacity and 400-pound capacity usually costs only slightly more in materials.
Using inappropriate materials causes most equipment failures. Never substitute inferior hardware, use damaged lumber, or skip recommended bracing to save a few dollars.
Inadequate anchoring creates dangerous situations. Wall-mounted equipment must attach to studs, not just drywall. Floor-standing equipment needs proper base width to prevent tipping.
Skipping safety testing before full use is reckless. Always test new equipment with minimal weight first, gradually increasing load while monitoring for any issues.
Poor planning leads to equipment that doesn’t fit your space or workout needs. Measure twice, build once—account for exercise movement space around each piece of equipment.
Maintaining Your Homemade Gym Equipment
Regular homemade gym equipment maintenance extends lifespan and prevents injury from equipment failure.
Monthly inspection routines catch problems early:
- Check all bolts for tightness
- Inspect wood for cracks or splinters
- Examine concrete weights for chips or cracks
- Test resistance bands for tears or weak spots
- Verify wall mounts remain secure
Cleaning prevents premature deterioration. Wipe down equipment after use to remove sweat and moisture that causes rust on metal parts and rot in wood.
Refinishing projects every 1-2 years maintain appearance and protection. Sand, re-paint, or re-seal wooden equipment as needed to prevent weather damage and wear.
Storage considerations matter even for home gym equipment. Keep resistance bands away from direct sunlight to prevent rubber degradation, and store weights on racks rather than directly on floors.
Expanding Your DIY Gym Over Time
Start small with gym tools that address your primary fitness goals. Add equipment gradually as your skills, budget, and workout needs evolve.
Prioritize versatile pieces that enable multiple exercises. A quality adjustable bench serves more functions than three fixed-position benches taking up space.
Community resources provide free or cheap equipment upgrades. Check Craigslist, Facebook Marketplace, and local garage sales for commercial equipment people are discarding that can inspire or supplement your DIY builds.
Skill development opens new project possibilities. Learn basic welding and suddenly custom metal equipment becomes accessible—take woodworking classes and complicated wooden builds become achievable.
Document your builds with photos and notes. This creates reference material for repairs and helps you improve designs in future versions.
Conclusion
Home made gym equipment empowers anyone to create a functional fitness space regardless of budget constraints or living situation. The projects covered here range from beginner-friendly concrete dumbbells to advanced power rack builds that rival commercial gyms.
Your DIY gym journey starts with a single project—maybe resistance bands from bicycle tubes or simple dumbbells from concrete. Each successful build increases your confidence and skills for more ambitious equipment.
The savings speak for themselves when you compare $350-$500 for a complete DIY gym against $2,000-$5,000 for commercial equivalents. But the real value comes from customization, space efficiency, and the pride of working out with equipment you built yourself.
Safety, proper materials, and realistic planning form the foundation of successful homemade workout equipment projects. Follow the guidelines provided here, start with simpler builds to develop skills, and gradually tackle more complex equipment as your experience grows.
Stop making excuses about expensive gym memberships or unaffordable home equipment. Grab some basic materials, dedicate a weekend to building, and start your fitness transformation with gym equipment that’s truly your own.
Frequently Asked Questions
Is homemade gym equipment safe to use?
Yes, when built correctly with appropriate materials and proper construction techniques. Always use load-rated hardware, inspect equipment before each use, and test with light weights before progressing to heavier loads. Quality DIY equipment can be just as safe as commercial alternatives.
How much money can I save building my own gym equipment?
Most people save 60-80% compared to buying commercial equipment. A complete home gym that would cost $2,000-$3,000 retail can be built for $350-$600 using DIY methods, not including the value of your time investment.
What’s the easiest DIY gym equipment for beginners to make?
Resistance bands from bicycle inner tubes and water-filled jug dumbbells require zero tools or skills. Concrete dumbbells and sandbags are slightly more involved but still beginner-friendly with just 2-3 hours of work.
Do I need special tools to build homemade workout equipment?
Basic projects only require common household tools like drills, saws, and screwdrivers. Advanced builds might need specialized equipment like welders or metal-cutting saws, but you can rent these for specific projects rather than purchasing them.
How long does DIY gym equipment typically last?
With proper construction and regular maintenance, homemade equipment lasts 5-10+ years. Concrete weights essentially last forever, while wooden equipment needs periodic refinishing. Metal components outlast commercial equipment when properly protected from rust.
Can I build gym equipment if I live in an apartment?
Absolutely! Focus on compact, multipurpose pieces like resistance bands, adjustable dumbbells, suspension trainers, and foldable equipment. Wall-mounted and doorway equipment maximizes vertical space without consuming valuable floor area.
What materials work best for outdoor DIY gym equipment?
Treated lumber, galvanized or stainless steel hardware, and weather-resistant finishes create outdoor equipment that withstands the elements. Apply annual maintenance coats of sealant or paint to extend lifespan significantly.